In many ways they never left. But often they were ignored, left to collect cyber-dust and possibly go horribly out of date, needing many updates as they are revived. But they’re coming back. The Great Centralisation that started in the early 2000s with the advent of Facebook seems to be coming to an end. At least in my circles. Old blogs are being revived. New blogs are popping up. People are talking about RSS feeds again. Platforms. Favourite way of doing formatting.
It’s really magnificent.
But then – how do you keep track of everyone’s blogs? How do you know what to pay attention to, if there isn’t an algorithm that manages it all for you?
There are ways. And here are mine.
Some blogs let you subscribe to a newsletter that sends when the blogger posts a new posting. I do this with a few of my blogs. Not this one, though. It’s a nice way of doing it if you don’t hate emails. I don’t actually get many good personal emails any more – it’s mostly notifications – so getting an email full of delightful content from people I like is really refreshing.
RSS. Really Simple Syndication. A standard that’s been around for 26 years (yikes!) and not changed in the last 16. It’s a standardised XML file of the content on a website. There are many ways you can subscribe to an RSS feed. Your browser can (or should be able to) create what looks like a bookmark folder that updates with all the latest postings from a website. You can get a special feed-reader app on your phone. Or a feel-collecting page on a website. Or in an email client in a similar way to the bookmark folder in a browser.
Or my favourite way: RSS-to-email. You can run scripts in Git Hub that will gather all the updates from a collection of RSS feeds, format them neatly into an email and send it to you however often you like. I’ve got my email set up to be delivered around 6am, so it’s there to skim as I’m waking up. It’s a bit of a fiddle to configure initially but having updates delivered daily, without me needing to open Yet Another App. I’m checking emails anyway.
I’m trying to collect a nice blogroll here, too. It’s a work in progress, obviously.
I don’t read a lot. I think it’s because I read slowly. I have occasionally posted reading-log (and one reading-slog) entries here. But I’ve moved that over to Futzle’s Bookwyrm instance.
Enshittification. noun Colloquial the gradual deterioration of a service or product brought about by a reduction in the quality of service provided, especially of an online platform, and as a consequence of profit-seeking.
Macquarie Dictionary word of the year in 2024. Relevant.
I’m never moving to Windows 11. I can’t list all of the reasons, because I can’t remember them all at the one time, but here is a short list of reasons why I think the operating system, and maybe the company in general, is going to shit. Windows 10 is bad enough. And most of these things are Windows 10 related.
Telemetry. Microsoft are over-reaching with what information they collect. I don’t want an operating system that spies on me when I’m using it. Escaping this in all software is getting harder and harder (especially with even Mozilla/Firefox going down a privacy-invasion path).
The Start Menu. It used to be the place to launch programs that you wanted to use. But now it gives you search results, lists applications that you don’t have installed, the weather, the stock market, sport results, and services that aren’t actually on my computer.
Default Settings. A fresh installation of Windows 10 takes up 75% of the task bar with a search bar, weather (“Temperatures set to rise!” – what is this? SimCity??), stock ticker, a start button, and a system tray. It’s all to cramped that the programs you open end up as just icons. Two instances of one program running and they’re grouped so you have to hover on the icon to open the instance that you want. In Windows 10 this behaviour can be changed, but I don’t understand why anyone would want to have their computer work that way. It’s as though people at Microsoft don’t use their own products.
OneDrive and MS365. Everything is OneDrive. Everything is MS365. But not quite well enough. On my work computer where I have to use OneDrive, I have two Desktop folders. One is C:\Users\bitterswede\Desktop and the other is C:\Users\bitterswede\OneDrive – placeofemployment\Desktop. Just let me store things on my computer.
Anyway. I promised a non-exhaustive list, so that’s what this will be.
So, with support for Windows 10 ending, what will I do, since I’ve taken the stand to never move to Windows 11.
Linux.
This year is, indeed, the year of Linux on the desktop.
The only issue I have with moving is that I need to abandon Affinity’s suite of software. It’s no massive loss and there are replacements, but I spent good money on them.
I’m going to order a new M.2 drive, and then install Ubuntu on that.
There are a lot of ways to “do” media in a house. Plex seems popular. Jellyfin, too. In the end they all do vaguely the same thing, it’s just a matter of picking the one(s) that will do what you want it to do.
I’ve been a long term Kodi user for TV and Movies, which I believe started life as XBMC – Xbox Media Centre. It
I loved Logitech Media Server (LMS) too. LMS would run on my first NAS that I bought, and would serve music to Raspberry Pi players that I scattered around the house. Then an update happened, and I couldn’t run it on the NAS directly, so I moved it to its own Raspberry Pi. I could use a Spotify plugin. Then the plugin misbehaved. Then Daniel Ek showed his true colours. I moved to Tidal. Players were flaky. Raspberry Pi audio quality wasn’t great and I looked at buying a HAT for the Pi for better audio and then I gave up. Last I heard LMS was being shut down – Logitech had had a gutfull and weren’t interested any more. Turns out it was handed over to the Community, and it is now Lyrion Music Server. I’ve not tried it, because I rejigged some things. Which is what this is about.
Switch the TV on, and amp switches on because of magic signals over HDMI. Cool. Until you want the amp to stay on to always be able to play audio. That was change number one. The setup is now simplified to be:
Raspberry Pi/KODI -> Amp -> TV
and all the media sits on a NAS that has a simple CIFS/SMB share.
The amp is always on, and doesn’t care if the TV is or isn’t. It will always play the audio that it receives from the Raspberry Pi.
KODI handles everything. All of the media library stuff, grabbing movie posters, TV episode details, and music.
You can drive it from the TV remote control over CEC (which comes default embedded into KODI), or using a pretty snazzy remote control app on a device connected to the network. There are versions for Android and Apple.
I love plain text files for documents. They’re future-proof, past-proof, and completely platform agnostic. I’m sure someone has written a text editor in Minecraft or something more outrageous. Text editor for Gameboy Colour? Text editor for a Casio F91W.
But sometimes text files need a little more oomph. Some va-va-voom. And this is where Markdown comes along. It’s still a plain text file, but you can format the text with some markup that ranges from very simple, to slightly less simple.
Like this:
# Heading 1
## Heading 2 - The headening
This is the body text.

1. This is
2. an ordered
3. list

and

- this is
- an unordered
- list

and

- [ ] these
- [ ] are
- [x] checkboxes
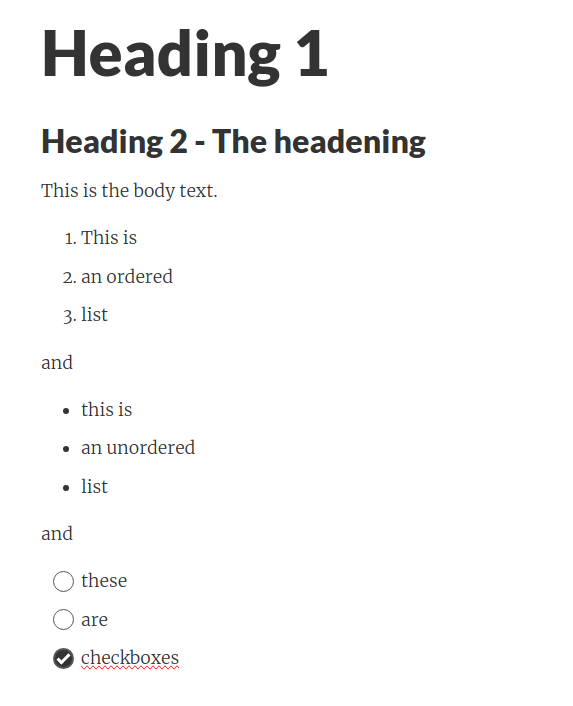
This then ends up looking like this:
when viewed through an interpreter. The themes can be tweaked, but you can tweak individual bits of the style. You can’t suddenly decide that your ordered lists part way through should be twice the size or something.
And it just works. The files don’t bloat. There is image support. Table support. All manner of things.
And because it’s plain text files, it works perfectly with your preferred version control system (git, most likely, right?) in a way that Word Documents don’t.
I recently stumbled upon Typora and it’s just bloody great. You can either type in code, or use the wysiwyg interface, or kinda use both at the same time where the styles update as you type in the code. It’s not free, but why should it be? It’s very well priced at AU$22. It’ll probably never stop working – and if it does, there are dozens of other text editors out there that will pick up your file and open it without any issues.
Start writing in Markdown. You’ll like it. I think.
I found the instructions on how to migrate self-hosted Ghost from one host to another quite lacking. It took a lot of tinkering to get it to work properly. And I still don’t quite understand why just picking up an install folder and database dump on one host and dropping it into the new doesn’t work. But I guess this isn’t LAMP-stack PHP-based simplicity.
So. Here goes.
Caveat
This post is going to assume a lot of knowledge, and doesn’t go into detail about specific steps. More about what steps are required than exactly how to do them. It’s also going to assume that your server is ready for running Ghost – all the prerequisites are there including ghost-cli. This will most likely be taken care of in Step 3 if it isn’t ready for running Ghost, but it’s not going to be covered here.
There will be downtime.
Caveat emptor. YMMV etc.
Step 1 – Export the Ghost data from existing host
Export all members to a CSV. Export the site details to a JSON – on older installs this is under Settings -> Labs, in the newer ones, it’s under Settings -> Import/Export. Grab a copy of the config file config.production.json
Step 2 – Update DNS
Point your domain to your new server IP. Don’t forget to do IPv6 too. Wait for propagation to happen. 10 seconds or an hour. Who knows! DNS is magic.
Step 3 – Install Ghost on the new host
This is done with the ghost-cli command ghost install in the directory that you want it to install. Once the installation process is complete, log in to the site, create your user and do all the basics. Delete the default posts and other users.
Step 4 – Migrate images over from the old host to the new