Introduction
Late last year, Let’s Encrypt, that wonderful semi-automated free SSL certificate service, announced that they would be adding support for wildcard certificates. A standard SSL certificate only covers the specific domains and sub-domains it was issued for, and needs to be modified or adjusted to allow more sub-domains. While it’s not a big deal to make these changes, a wildcard SSL certificate is a really simple way of covering yourself for all the different sub-domains you might have, and might want down the track.
Getting the wildcard certificate (or even a “normal” certificate) from Let’s Encrypt can seem daunting at first, but with the right information, it goes smoothly most of the time.
This post is going to cover how to get a hold of a wildcard SSL certificate from Let’s Encrypt, and then how to get that SSL certificate into your Windows box to use with IIS. I’m going to gloss over the parts where the pfx file is being copied from Linux to Windows, assuming that you know how to use ssh/scp/pscp to move files about.
Ready? Right. Onwards.
Links
Requirements
You’ll need to have access to:
- A linux machine, where you are a sudoer (or root) (I did this with an Ubuntu 16.04LTS box).
- Your public DNS zone for the domain you’re trying to get the certificate for.
- Your IIS box.
Assumptions
I’m going to assume you have SSH access to your Linux machine, and that you know how to use it. Also that you know how to add TXT record to your public DNS zone.
You’ll need to move your freshly minted pfx file from the Linux machine to the Windows machine. I use PuTTY and pscp to move files to and from Linux boxes from Windows. I think you should too.
I’m also assuming you know how to change which SSL certificate a binding is using in IIS.
Let’s do this:
Most of this will be done in the Linux machine, so connect to it with PuTTY.
Download certbot-auto by running the command
wget https://dl.eff.org/certbot-auto
Then make it executable by running
chmod u+x certbot-auto
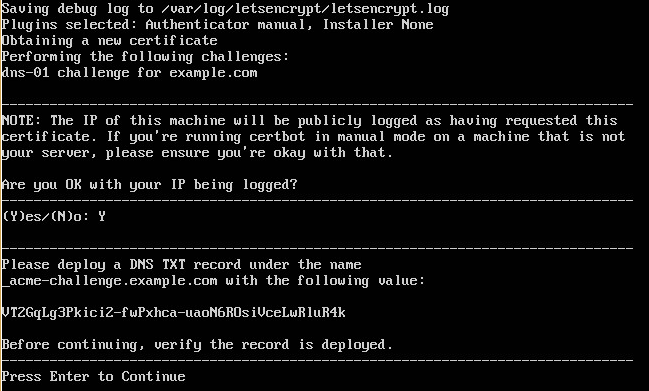
Certbot-auto is a glorious script that makes everything happen pretty much automatically. It will grab all the required dependencies, it’ll request the certificate for you, tell you what to put in your TXT record, then put the certificate in a sensible spot for you.
Let’s request that certificate for your favourite domain, *.example.com.
sudo ./certbot-auto certonly -d *.example.com --manual --preferred-challenges dns-01
As it’s your first time running certbot-auto, it will probably download and install a bunch of apt packages. Once it’s done, it will request the certificate, and assuming everything has gone well, prompt you to create the TXT record for your domain.
TXT Record
Now is the time to create the TXT record with the string provided by certbot for _acme-challenge.example.com. If you’re unsure how to do this, as your hosting provider to help. Or a friendly friend.
Once you’ve set it up, it’s time to hit Enter to finish certbot’s job. Wait for that to happen, then it’s time to move on to exporting the keys into a format Windows can handle.
Exporting
Your newly minted SSL certificate will be found in the following directory:
/etc/letsencrypt/live/example.com/
together with a README file, and three other files. That live folder is locked down, so you can only get to it as root. You can either switch to root, or you can sudo the following command from your home folder (I recommend the latter, but do the former).
So, from your home directory, run the following command:
sudo openssl pkcs12 -export -out example.com.pfx -inkey /etc/letsencrypt/live/example.com/privkey.pem -in /etc/letsencrypt/live/example.com/fullchain.pem
Enter a password when prompted, and you will have generated a PKCS #12 archive of the SSL certificate. This format is very easy to import into IIS in the next step.
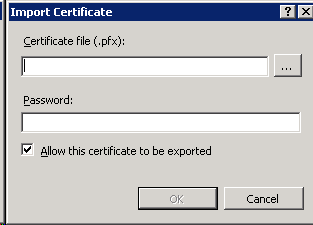
Importing the key into IIS
The final two steps are to import the key into IIS, then change the binding to the newly imported certificate. I’m doing this in IIS7 on Server 2008R2, but shouldn’t be too different in newer versions.
Copy the file from your Linux box to the Windows server (most likely with PSCP), then start up the IIS manager.
Open the Server Certificates feature, then click on “Import…” under actions in the top right hand corner. Find the file, enter the password you picked, and you’re done. Change the bindings for the sites you would like to use this new SSL certificate, and you’re done.
Bonus – Installing Certificate into UniFi
sudo keytool -importkeystore -deststorepass aircontrolenterprise -destkeypass aircontrolenterprise -destkeystore /var/lib/unifi/keystore -srckeystore path-to-your-exported-pfx -srcstoretype PKCS12