UPDATE, 2018/04/15: It turns out the Orange Pi wasn’t reliable. I will re-write this for Raspberry Pi instructions shortly. It won’t be very different, but a couple of things change.
Downloads
Required
- Armbian Ubuntu Server
- Win32DiskImager
- Putty
- 7-Zip
- Pi-hole (done from the device automagically, later)
Optional (but helpful)
Background
Right. I was googling about ideas for how to do a system-wide ad-block, and realised that it could probably be used to filter other things from the net as well. As is nearly always the case with these things, someone has already done all of the hard work, and all we need to do is assemble the right pieces of the jigsaw. I’m basing this on an Orange Pi computer, but it should be easily adaptable if you want to use a Raspberry Pi instead.
To get how all of this works, you need to have a basic understanding how your network works at home. Fortunately it isn’t that complicated, and if you use some familiar concepts as analogies (phone numbers and phone books) it’s easy to grasp. I’m going to write this from a perspective of getting the filtering up and running on a simple home network that has a modem/router and a few devices connected to it, via Ethernet and Wifi.
Oh, and for now I will assume a Windows based environment for setting all of this up. The only thing that is different, though, is that on Mac or Linux you don’t need Win32DiskImager or Putty – there are commands available natively (dd and ssh) that do the same thing.
IP Addresses
Think of an IP address as your device’s phone number. Your device can either have its IP address assigned automatically (usually by your router) by something called DHCP, or you can assign an IP address manually. When you assign an IP address manually you have to specify at least four things for your internet to work. The address, the netmask (let’s not get in to this right now!), the gateway address (the IP of your router), and the IP address of your DNS server (this is where the magic is going to happen a bit later!).
DHCP
I don’t think there’s any benefit in going in to detail about DHCP beyond the fact that it’s what hands out your IP addresses with all of the correct details automatically. The DHCP server keeps track of all the devices that have been given an IP address, when that happened, and the name of the device. It does all this based on MAC addresses. You don’t really need to know anything about MAC addresses other than that they’re supposed to be unique for every networking device that has ever been made and will be made. MAC addressing is a 48-bit space, so there are 281,474,976,710,656 possible MAC addresses. Should last a while.
DNS
Right. This is where the magic that ties together the whole Internet happens. Without DNS, we probably wouldn’t have the modern Internet. Think of DNS like a big, dynamic phone book. Every site on the Internet that you can get to has an IP address. But remembering IP addresses is difficult. It’s way easier to have a phone book where you can look up the IP address of bitterswede.com and get the answer 103.9.170.230. And because of some smart people in 1984, DNS happens automatically and quietly in the background for you.
I probably need some sort of tangent warning. Maybe italics to signify things you can skip. There aren’t many IPv4 addresses left – there were only 4,294,967,296 in the first place, give or take. Thanks to DNS, we can have multiple websites sharing the same IP address. So while, this website points to 103.9.170.230, so do many others. There are some smarts in the server that looks at the domain name that’s been entered, and then shunts the user to the right web page on the server.
Hardware Required
To do this, you need a computer with an Ethernet port. I like Raspberry Pi computers, but they’re not as cheap as they seem (thanks to exchange rates and freight). Don’t get me wrong – they’re amazing at around $50 for the board, but we can go cheaper.
I installed Pi-hole on a small system called the Orange Pi Zero. Shipping is a bit of a killer on this one, too, but at US$17.79 with shipping and a case, we’re at around half the price of the Raspberry Pi (exchange rates are variable, so this might not always be true).
I’m not suggesting that the Orange Pi Zero is an equivalent machine to a Raspberry Pi 3. They are very different beasts, but in this situation, we don’t need the more expensive, more feature-filled Raspberry Pi.
You also need a decent quality micro USB power cable and transformer, and a micro SD card – these are around the $10-15 mark each, depending what you get. So we’re at around the $45-55 mark now. You also need a network cable, but these are easy to get very cheap – $3-4 for a short Cat6 cable. You probably have one around the place.
Right. You’re ready to go now. You’ve downloaded the Orange Pi image and used 7-zip to decompress it until you have a .img file somewhere sensible. You’ve installed Fing and Win32DiskImager. Downloaded Putty and put the program on your desktop (you don’t need to install Putty – it just runs). Let’s do it.
Pop your SD card into your computer and pay close attention to the drive letter it gets assigned.
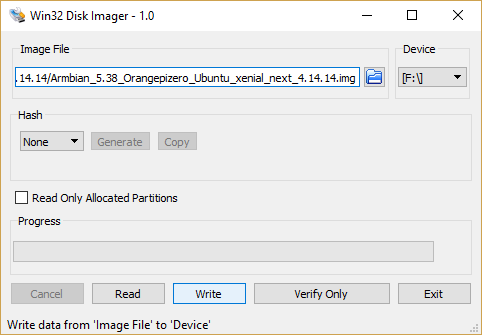
Open Win32DiskImager and click the folder to the right of Image File. Make sure the Device is set to your SD card (in my PC it’s the F drive) and click on Write. While it’s writing to the card, it’s a good time to get a feel for your network. This is where Fing comes in.
Fing
We can use Fing to scan for all the devices currently connected to your network.
Open a command prompt. In Windows 10, right click the start icon in the bottom right, and click either Command Prompt or Powershell in the menu that appears. In Windows 7, the easiest thing to do is to click the start menu and typing cmd. Command prompt will appear in the list. Click on it.
Assuming you installed Fing in the default location, type:
cd “\Program Files (x86)\Overlook Fing 3.0\bin\”
Then type fing and press enter.
After a short while you’ll be greeted with a summary list that looks like this.
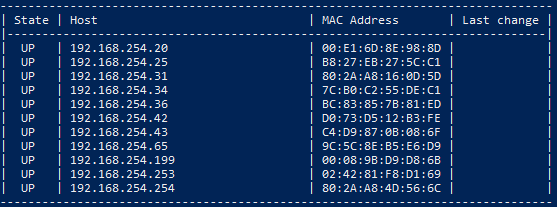
Keep note of all of the Hosts in that list. Once you boot up your Orange Pi there’ll be a new one in the list, and you’ll need the IP address.
Press Ctrl-C to stop Fing from scanning repeatedly.
Keep in mind that my IP range will be different from yours. Yours might start with 192, 172, or 10. It doesn’t matter for this situation, but you need to keep track of it.
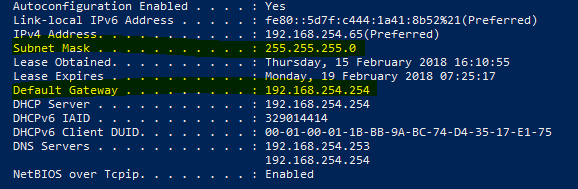
While you’ve got the command prompt open, run the command “ipconfig /all”. You’ll get a list of all the network adapters in your computer, and their addresses. The information you’re looking for are the Subnet mask (probably 255.255.255.0, but maybe something else), and the gateway address. Usually it ends in a 1 or a 254.
It looks something like this. Make a note of the information.
Time to fire up the device
The SD card should now have the image written to it, and Win32DiskImager should have greeted you with a “Write Successful” notice.
Pop the SD card in the Orange Pi, connect the Orange Pi to your router via the network cable, and lastly connect the power to it. It can take up to a minute to boot, but usually it takes about 30 seconds.
Go back and run Fing again. If everything has gone according to plan, you should now have a new device in your Fing summary list. Make note of the IP address.
Start Putty and put the newly found IP address into the Host Name field and press enter. You should be greeted with a black screen that says login as:
Still assuming we’re using the Orange Pi, type orangepi for the username and press enter. The password is 1234. When it logs in, you’ll be asked to enter the old password again, then a new one. Then follow the steps to create your new username and a new password for that account too. It’s all reasonably straight forward, just read the instructions, and remember that you don’t need to fill in all the bits about phone numbers or room numbers.
Close the Putty window when you’ve created your new user.
Open a new Putty instance, and log in with your new username instead of the orangepi one.
Once you’ve logged in, you’re ready to install Pi-hole.
Installing Pi-hole
Installing Pi-hole is very simple. Once you’ve logged in as your newly created user, type
curl -sSL https://install.pi-hole.net | bash
And press Enter.
You’ll be asked for your password, and then it’s a few minutes of waiting for it to install. The installer is very well written, and will take you through all the required steps. The main one to look out for, however, is the IP configuration. You want to change from a dynamically assigned IP to a static one. I normally pick one next to my router’s IP. In my case that’s 192.168.254.254, so the closest available IP is 192.168.254.253. My Subnet is 255.255.255.0, and my gateway is 192.168.254.254.
The DNS server to use doesn’t really matter when it asks. Using Google’s DNS servers is probably sensible. Select it from the list.
When you’ve finished the installation Wizard, you will be given a password. Write this password down. It’s important.
Because you’ve changed IP address, you need to reboot. You can do that from the command prompt by typing
sudo reboot
While it’s rebooting, log in to your router. This is where you’re on your own a bit. You need to change the DHCP server settings in your router to distribute the IP of your Orange Pi as the DNS server.
In the Command Prompt on your PC, type:
ipconfig /renew
And you should get a new IP address (or probablyt he same one) but with updated DNS server details.
You should now be able to go to http://pi.hole
If that takes you to a web-page, everything is configured correctly, and you should not be getting any ads when you browse. It should also block ads in apps, YouTube, and everywhere else.
We just need to add a porn blocking list, too.
Adding a list
In the web interface, log in using the password that was generated for you.
Go to Settings, then Block Lists.
Add this one and save and update.
https://raw.githubusercontent.com/chadmayfield/my-pihole-blocklists/master/lists/pi_blocklist_porn_all.list
You’re now good to go. Check if the blocking works by visiting your favourite adult site.
I’m happy to field questions from friends about this tutorial – I can come over and help you out, or we can do a Teamviewer session to figure out what’s going on.
It was written up a day after I finished the install. One day I will tidy it up and firm up some of the details. If you feel like emailing me information about your router model and how to change the DHCP settings in your model, I will include it in the tutorial.
I’d also like feedback on how you went if you used it.